


Showing posts with label Breakfast. Show all posts
Showing posts with label Breakfast. Show all posts

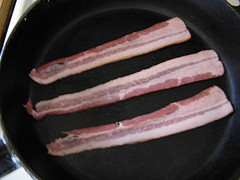
Method 1: Cooking Bacon in a Frying Pan


Step 2: As your bacon is cooking constantly turn it over so that it cooks evenly on both sides. If too much fat collects in the pan you’re going to want to drain it. During this process there shouldn’t be any black on the edges of the bacon at all. If there is that means it’s burning and you need to turn down the heat. Depending on how thick your slices are or how many are in the pan, your bacon should be done in about 10-15 minutes. You will know it’s done when it turns a deep brown color. When finished drain on paper towels. The bacon should not be fully crisp while it’s still in the pan. It will crisp after the paper towels soak up the fat.
Method 2: Cooking Bacon in the Microwave


Step 2: Put your bacon into the microwave and microwave on high for 3 minutes. Check and see if your bacon is done. If it isn’t, microwave for an additional 30 seconds or until it’s crispy.
Method 3: Cooking Bacon in the Oven

Step 2: Line your baking pan with aluminum foil. The one I use is about 1 ½ inches deep but you could use one that is about ¾ of an inch deep. Now separate your slices of bacon and place them side by side on the baking sheet.
Step 3: Place your baking pan into the oven. During the cooking process if fat becomes excessive you should take your pan out of the oven and drain it off.
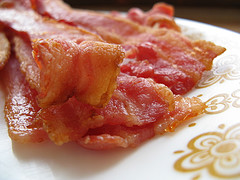
Step 4: The bacon should be crisp into about 15-20 minutes. Remove from the oven and transfer bacon onto paper towels to soak up the fat.


- 1 large potato
- 1 tablespoon olive oil
- ½ teaspoon paprika
- ½ teaspoon garlic powder
- ½ teaspoon chili powder
- ½ teaspoon onion powder
- ¼ teaspoon salt
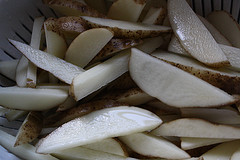

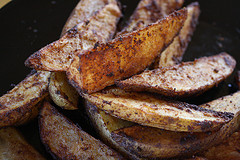
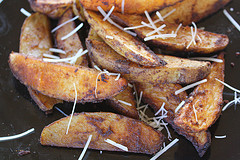
Step 2: In a large bowl mix olive oil, paprika, garlic powder, chili powder, onion powder and salt. Coat fries with the spice/oil mixture and place on a greased baking sheet.
Step 3: Bake for 30-35 minutes. Flip wedges on their other side half way through cooking.

Ingredient:
- Ingredients:
- Large patra leaves (colocasia leaves)
- 1/2 cup Tamarind extract (juice)
- 1 cup Gram flour (besan)
- 3 tsp Chilli powder
- 1/2 tsp Turmeric powder
- 3-4 pinches Asafoetida
- 1 tsp Crushed cumin seeds
- 3 tsp Powdered sugar
- 1tbsp Oil
- Salt to taste
- 1 tbsp Oil
- 1/2 tsp. each Cumin & musard seeds
- 1 tsp Sesame seeds
- 1 tbs Coriander leaves finely chopped
- 1 tbs Coconut grated fine
- Clean, wash and wipe leaves.
- Roll lightly with a rolling pin.
- Keep aside.
- Mix all ingredients except those for seasoning to a thick paste.
- Take a leaf and place it backside up on a flat surface.
- Take a little paste and apply thinly all over leaf surface.
- Place another leaf over it.
- Repeat the process on a set of 3-4 layered leaves, top layer being that of paste.
- Fold in the edges and roll the leaves, starting with their base towards tip.
- Make the roll tight and seal sides with some paste.
- Make more sets of 3-4 layered leaves until the paste is finished.
- Steam the rolls in a double boiler or steam cooker for 30-40 minutes.
- Cool and remove. Cut into 1/2" thick slices.
- Heat oil, add cumin and mustard seeds, allow to splutter.
- Add sesame, coriander, and coconut.
- Add salt, chilli and sugar if needed.
- Mix well, serve hot or cold.

Ingredients:
- Chickpeas - ? cups (soak 2 cups of dry chickpeas overnight)
- Onions - 1 large,sliced
- Garlic - 3 to 4 pods, crushed
- Green Chillies - 1 or 2
- Chana masala - 1 tbls
- Red chilly powder - 1 tsp.
- Cumin seeds- 1 tsp.
- Salt to taste
- Cilantro - 1 small bunch, chopped
- Oil - to deep fry.
- In a pan, add 1 tbls of oil, then add the jeera, onions and garlic and cook till softened.
- Drain the chickpeas and wash well and keep aside.
- Add the sauteed onion-garlic mixture to the above drained chickpeas and pulse in ur food processor or blender till it is all well combined. Do not add too much of water, 1 or 2 tbls will help if you are using a blender. I have Kitchen Aid and i was able to make it to a rough paste - used the pulse function.
- Now put the above in a bowl, then add salt, red chilly powder, chana masala and cilantro and combine well.
- Now refrigerate the above mixture for 3-4 hours, to let the flavors combine well.
- Take the mixture out of the refrigertor about half an hour before.
- Heat the oil, but make sure the oil does not smoke.
- Make small falafel balls, and deep fry this in medium flame.

Ingredients:
- 1 tsp instant coffee
- 3/4 cup milk
- 1 tsp vanilla extract
- 2 tsp sugar
- Ice cubes
- 2 tsp chocolate syrup
- Add all the ingredients to the blender including instant coffee, milk, vanilla extract, sugar, ice, and chocolate syrup in a blender.
- Blend them all until become smooth and creamy.
- Serve in beautiful serving glasses and add some whipped cream on top.


- 6 roma tomatoes (chopped or diced)
- ½ cup sun-dried tomatoes (packed in oil)
- 3 garlic cloves (minced)
- ¼ cup olive oil
- 2 tablespoons balsamic vinegar
- ¼ cup fresh basil (chopped with steams removed)
- ¼ teaspoon salt
- ¼ teaspoon pepper
- 1 French baguette
- 2 cups shredded mozzarella cheese
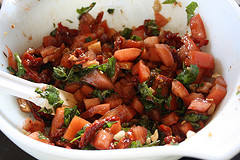

Step 1: In a large bowl combine diced roma tomatoes, sun-dried tomatoes, fresh garlic, olive oil, balsamic vinegar, basil, salt and pepper. Mix well and allow the mixture to sit for at least 10 minutes.
Step 2: Slice the French baguette into ¾” thick slices. Arrange the slices on a baking sheet in a single layer. Using the broiler setting on your oven, broil for 1-2 minutes turning half way through or until slices are lightly browned on both sides.
Step 3: Divide the tomato mixture evenly onto all the baguette slices. Top with mozzarella cheese. Broil until the cheese is melted (about 5 minutes or less.)
(Makes 12 Servings)

These burgers are great with a thick slice of tomato and for the cheese- you can either use slices of Monterey jack or cheddar. This will make 2 large burgers or you could get more depending on the size of your patties. Enjoy.


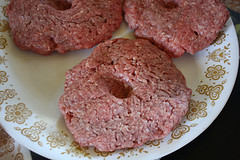
- 1lb ground beef chuck
- 1 tomato (sliced)
- 2 slices Monterey jack or cheddar cheese
- lettuce (torn)
- salt and pepper (to taste)
- canola oil (for brushing)
- Hamburger buns
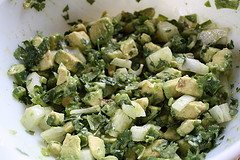
- Avocado relish-
- 2 avocados (chopped)
- ½ of a small onion (diced)
- 1 jalapeño pepper (minced)
- 3 tablespoons cilantro (chopped)
- The juice of 1 lime
- Salt and pepper (to taste)
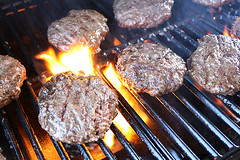
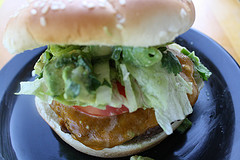
Step 3: To assemble burgers- place a patty on the bottom of a hamburger bun. Top with a slice of tomato, lettuce and avocado relish. Cover with the top half of the bun.

Ingredients

- Fine rava/fine soji/chiroti rava -1 cup
- Yogrut/curd - about 3/4 to 1 cup
- Red onion finely chopped -1/4 cup
- Green chillies- 3 or more
- Corriender leaves – choppped 2 tsp
- Corriander leaves 2 tbsp
- Salt according to taste.
- Heat a tsp of oil or ghee and fry fine rava till light brown or the raw smell is gone.
- When the rava is cool enough,take a bowl mix everthing together add curd little by little. Batter should be of thick consistancy(like we make for channadal vada).
- Meanwhile heat peanut oil on medium high heat.
- When hot enough make small round balls and flatten it with palm of you hand and deep fry till golden brown. Its ready to eat .Enjoy!!!

Ingredients
- Chopped fresh tender Lady’s Finger – 1 cup
- Sona masoori rice (raw) – 2 cups
- Blackgram Dal – 4 teaspoons
- Green chillis – 1-2 (optional)
- Ginger – 1″ piece(optional)

- Wash, chop tender lady’s finger into small pieces and soak the same with raw rice and Blackgram dal in water for about 3-4 hours as usual .
- Grind it in the mixer to a fine consistency adding water in steps to a fine consistency. The ground batter is as shown in the image below.(Use the same water for grinding the batter and also one may need additional water as well.)

- Add required quantity of salt and allow it to ferment overnight and the batter is as below.

- Place a dosa griddle on medium flame and apply a little oil to it. When heated rub it throughout the griddle and sprinkle a little water on the griddle. When dried pour a laddle of the batter on the tawa.

- Spread it to the required thickness with the help of the laddle and sprinkle cooking oil on the sides as well as in the middle.

- When crispy, serve hot with the chutney of your choice (See list of possible chutneys here). Yummmm !


